
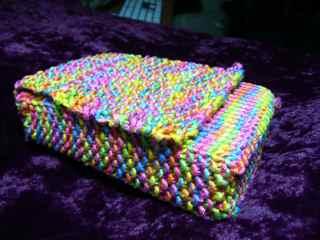
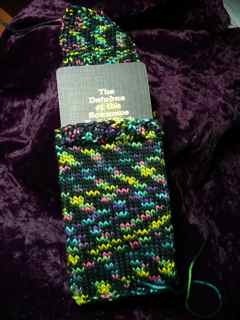
 Well, I think I’ve come up with just about my perfect knitted tarot bag design, although I’m still looking for the ideal yarn. My bags are fitted and have squared-off sides and bottom—you could almost call them cases rather than bags. Pictured are two versions in cotton. I think I’ll try a hemp yarn next as its slight stiffness might give a little more body to the case.
First I knit a sample to get the yarn’s gauge (using smaller needles than the yarn normally calls for). I determine the number of stitches to match the deck’s measurements plus about 1/8″ to 1/4″ for each dimension.
 I knit the flap in seed stitch (Row 1: k1p1; Row 2: p1k1)* so it will lie flat. When the flap, including top edge, is long enough, I cast on enough additional stitches to knit the rest of the bag in the round with 5 double pointed sock needles. (Note: Plan on adding 1 or 2 stitches to the front and back needles as the seed stitch used on the flap is wider than stockinette stitch.)
Needle 1 = knit side stitches in seed stitch; needle 2 = front stitches in stockinette; needle 3 = side stitches in seed stitch; needle 4 = back stitches in stockinette (the back continues directly on from the flap). Optional: My needle 2 (front stitches) begin with 3 rows of k1p1 ribbing to keep the top edge from curling.
 In order to have a nice flat bottom I end the body with a purl row to define the edge. My bottom is stockinette with the purl side out. You want to be positioned to begin a needle 1 (side) row. Pick up the adjacent stitch from the back (needle 4) and purl together with the first stitch of needle 1. Purl until one side stitch remains on needle 1; purl it together with the adjacent stitch from the front (needle 2). Turn the work. Knit together the next stitch from needle 2 with the first stitch on needle 1. Knit the rest of the stitches on needle 1 except one. Knit this last stitch together with a stitch from needle 4. Turn the work. Repeat as above until you reach the other end of your case and meet the stitches on needle 3. Knit the stitches from needles 1 & 3 together using a Kitchener Stitch. (Note: you may need to turn the bag inside out in order to do the Kitchener Stitch. This is better anyway as the final row will have the purl side out.)
I then weave the beginning and ending tails of yarn to a center point on the front edges so that the tails become ties for securing the center of the top flap to the center bottom edge.
Happy knitting. All suggestions for yarns or improvements are gratefully accepted.
See the earlier version of my tarot case and links to other tarot bags here.
 Mary K. Greer has made tarot her life work. Check here for reports of goings-on in the world of tarot and cartomancy, articles on the history and practice of tarot, and materials on other cartomancy decks. Sorry, I no longer write reviews. Contact me

15 comments
Comments feed for this article
March 14, 2008 at 2:42 am
judithornot
Thank you for sharing this, Mary! My knitting skills are still at the beginner level, but will tackle this one after I finish a couple other projects (mostly hats, at this point). I love the way your varigated yarn knitted up. Did you use medium weight yarn?
March 14, 2008 at 3:32 am
nettle
Thanks, these are beautiful! I’ve been looking for the perfect tarot bag pattern; now I’m going to churn out a bunch of these.
March 14, 2008 at 4:36 am
Britta
Ooh, those are lovely! I would think that sock yarn might work really well. Most sock yarns have a little bit of nylon content for added strength, and some are super-wash too, so if they got dirty, you could throw them in the laundry.
Personally (and this is just my personal taste) I think they would be really fun with an antique brooch.
I’ve been sewing my own bags from velvet and silk remnants, but now I need to knit a bag or two- and perhaps an interesting cable on the back would be fun…
By the way, you might enjoy http://www.ravelry.com- it is an enormous knitting/spinning/crochet website with forums, and there is a knitting tarot forum. We’ve had some fun and interesting discussions there.
March 14, 2008 at 4:39 am
Britta
Oops- the dash screwed up the URL. Ravelry can be found at http://www.ravelry.com
March 14, 2008 at 8:32 am
marygreer
judithornot – Both the rainbow yarn and the stained glass&black yarn are Tahki Cotton Classic Colors. They recommend a US6 (4mm) needle. I used a US3 (3.25mm) needle to make the fabric nice and tight. I’m currently working with a finer cotton yarn with a metallic thread running through it on 2.75mm needles.
Britta – i used a super-wash wool for my first bag, but I don’t think it would be a good idea to store a deck in it for long. I think the lanolin in the wool might effect the card stock over time. An antique brooch sounds fun, but I tend to stack my decks in a pile, and so I prefer a flat front and back. I’ve been to ravelry.com. Great site! Haven’t tried their forum. I also like http://www.knitty.com . I knit a couple of pairs of “Monkey Socks” from a great pattern I found there. I like doing fairly mind-less knitting while watching TV in the evening.
Anyone who needs help with some of the knitting basics (and more advanced stuff, too) – there are great mini-videos that demonstrate the techniques clearly at http://www.knittinghelp.com/ .
Mary
March 14, 2008 at 2:34 pm
JJ ColourArt
It would be fiddly to work out the tension for different cables in one project, but I think a sampler of cables would look good on one of these.
You could have them horizontally across the front and back and one down each side. Cables are also not as stretchy.
March 14, 2008 at 7:16 pm
marygreer
JJ – I like the idea of cables – especially down the sides. I gave up a project once because of problems with the cables, so maybe this will get me back into them.
Mary
March 15, 2008 at 4:22 am
Annette
Wow, I only wish I knew how to knit! I have vowed to learn…. truth is, I started to learn about, oh…23 years ago…But haven’t tried since.
March 15, 2008 at 7:05 am
marygreer
Annette – Knitting is all the rage these days. I’m sure there must be a yarn store near you. Most have knitting classes and sometimes groups who just knit together and help each other. The online resources mentioned in some of the comments above are incredibly helpful, too.
Mary
March 15, 2008 at 2:24 pm
Suna
Yes, Annette, local yarn shops usually have some very patient teachers who really want to help people learn in a fun atmosphere (I admit it–I am one of them, and about to go teach knitting this morning!). I’ve never had a student fail to learn to knit yet.
I am lucky to have a lot of knitters in my tarot circle, so I enjoy the best of both worlds. I’m new to this blog, and was so happy to learn that Mary also is a knitter like me, after all these years of enjoying her work in my tarot practice!
March 15, 2008 at 2:51 pm
JJ ColourArt
Oh forgot to say, cables might be VERY nice for a Celtic themed deck.
If someone likes knitting but doesn’t like hand work, or can’t do it because of arthritis or something, knitting machines are great, and you can still hand knit the cuffs and bottom with fancier stitches, or cables.
March 16, 2008 at 3:00 am
Marlyse Comte
These are beautifully done!
March 16, 2008 at 8:02 pm
mama kelly
These look so lovely ….. I may have to try and do something like this in crochet!!!
blessings!
September 29, 2011 at 10:14 pm
raven53
Since I don’t like to use really little needles, I doubled up the yarn. So I’m using 6 needles, and using two strands of worsted yarn.
September 30, 2011 at 7:58 am
mkg
Raven and everyone else –
Whatever works! I keep fiddling wih the pattern and I try different yarns but I still like 100% cotton best. The cards slide easily in and out and it holds the shape if you knit very tight. I use really small needles.
Mary