
You are currently browsing the category archive for the ‘Knitted Tarot Bags’ category.
I’ve found those see-through organza bags to be perfect for displaying decks that come in huge boxes. I put the box in storage and the deck in my bookcase where I can identify it easily without having to take it out of its bag. Corrine Kenner has a link to a site with great prices on packages of 30 single color bags – or get together with a couple of friends and buy several colors to mix-and-match. While at Corrine’s blog, check out the latest on her upcoming book Tarot for Writers, which is sure to be a hit.
Bright Idea: I bought “Smokey Blue” organza bags. I’ll bring them to LATS and BATS to trade colors with those who bought other colors. I’ll also have my knitted tarot cases for sale.
Added: I’ve been told these bags are available very inexpensively at Dollar & gift stores. My local stores don’t sell the right size, but I’ve been told others do. Anyway—I have a shelf full of Llewellyn books and decks and found it was the best way to keep the decks so I could find them easily.
Knitted Tarot Case Instructions
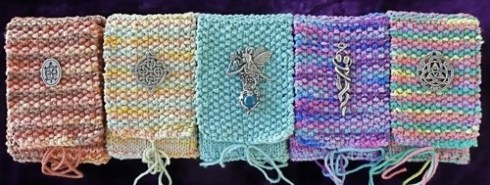
Finally, here’s the complete instructions (as a pdf file) for my knitted tarot bag (I prefer “case” since there are four sides and a flat bottom) as pictured in my earlier posts and above. Send me pictures if you knit your own. Happy knitting.
Here’s a few more tarot bags that I’ve knitted while watching TV this winter. The first picture is of a purplish drawstring bag made from two wool sock yarns mixed. My favorite yarn so far for my tarot cases is the 100% cotton Lily “Sugar ‘n Cream” 4-ply worsted (see the last two pictures – a flecked off-white and striped brown). This brand offers tons of colors and a whole set of “Naturals.” I use size US3 needles instead of the recommended US7 in order to get a tight knit which gives firmness to the bag and makes it feel more like a case. If you have a knitted tarot bag you like, send me a link to your pictures and/or knitting instructions and I’ll post them here.


Update: Check out Amber’s knitted tarot bags here and her limited edition Knitting Tarot deck and book here. Get instructions for knitting my Tarot case here.
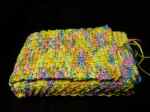
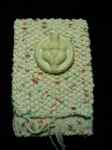
 Well, I think I’ve come up with just about my perfect knitted tarot bag design, although I’m still looking for the ideal yarn. My bags are fitted and have squared-off sides and bottom—you could almost call them cases rather than bags. Pictured are two versions in cotton. I think I’ll try a hemp yarn next as its slight stiffness might give a little more body to the case.
First I knit a sample to get the yarn’s gauge (using smaller needles than the yarn normally calls for). I determine the number of stitches to match the deck’s measurements plus about 1/8″ to 1/4″ for each dimension.
 I knit the flap in seed stitch (Row 1: k1p1; Row 2: p1k1)* so it will lie flat. When the flap, including top edge, is long enough, I cast on enough additional stitches to knit the rest of the bag in the round with 5 double pointed sock needles. (Note: Plan on adding 1 or 2 stitches to the front and back needles as the seed stitch used on the flap is wider than stockinette stitch.)
Needle 1 = knit side stitches in seed stitch; needle 2 = front stitches in stockinette; needle 3 = side stitches in seed stitch; needle 4 = back stitches in stockinette (the back continues directly on from the flap). Optional: My needle 2 (front stitches) begin with 3 rows of k1p1 ribbing to keep the top edge from curling.
 In order to have a nice flat bottom I end the body with a purl row to define the edge. My bottom is stockinette with the purl side out. You want to be positioned to begin a needle 1 (side) row. Pick up the adjacent stitch from the back (needle 4) and purl together with the first stitch of needle 1. Purl until one side stitch remains on needle 1; purl it together with the adjacent stitch from the front (needle 2). Turn the work. Knit together the next stitch from needle 2 with the first stitch on needle 1. Knit the rest of the stitches on needle 1 except one. Knit this last stitch together with a stitch from needle 4. Turn the work. Repeat as above until you reach the other end of your case and meet the stitches on needle 3. Knit the stitches from needles 1 & 3 together using a Kitchener Stitch. (Note: you may need to turn the bag inside out in order to do the Kitchener Stitch. This is better anyway as the final row will have the purl side out.)
I then weave the beginning and ending tails of yarn to a center point on the front edges so that the tails become ties for securing the center of the top flap to the center bottom edge.
Happy knitting. All suggestions for yarns or improvements are gratefully accepted.
See the earlier version of my tarot case and links to other tarot bags here.
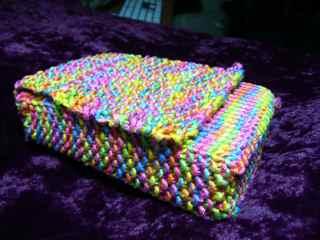
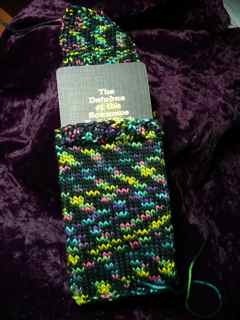
 I enjoy knitting socks but end up with a lot of leftover yarn. I looked through several books with patterns for bits and ends and saw a cool ipod case. That made me think of knitting a tarot bag. One of the things I don’t like about bags is that they’re usually loose and bulky, so I wanted something slim and fitted. Here’s my first effort – more of a fitted deck-sock-with-a-flap than a bag. I used sock yarn where all the designs are dyed into the yarn. This one also has some metallic silver running through it. I knitted it on five – US1 (2.25mm) double-pointed needles at 8 stitches per inch (in the round). I started with the flap and then cast on the remaining stitches to make the bag. I just measured it for the exact size of the deck figuring the yarn would stretch a little to get the deck in and out. The size is just about perfect. I like the flat fitted bottom that I created by knitting mitered corners and then doing a Kitchener stitch to connect the remaining front and back stitches.

For my next attempt I plan on changing a lot of things. I’ll probably do it all in seed stitch and have the flap come all the way down to the bottom. Warning: don’t store cards in wool or silk for long periods as these fibers can attract bugs and breakdown paper products. Click on the pictures to see a larger view.
Here are a couple of other designs that look interesting:
http://mollieknits.wordpress.com/20…13/hello-world/
http://hippymamaknits.blogspot.com/…t-card-bag.html

 Mary K. Greer has made tarot her life work. Check here for reports of goings-on in the world of tarot and cartomancy, articles on the history and practice of tarot, and materials on other cartomancy decks. Sorry, I no longer write reviews. Contact me

Recent Comments